Installing Qiskit
Requirements
Qiskit supports Python 3.5 or later. However, both Python and Qiskit are evolving ecosystems, and sometimes when new releases occur in one or the other, there can be problems with compatibility.
If you’re having trouble installing or using Qiskit after updating Python, check the Qiskit Package metadata for Programming Language to see which specific versions of Python are supported.
We recommend installing Anaconda, a cross-platform Python distribution for scientific computing. Jupyter, included in Anaconda, is recommended for interacting with Qiskit.
Qiskit is tested and supported on the following 64-bit systems:
Ubuntu 16.04 or later
macOS 10.12.6 or later
Windows 7 or later
Install
We recommend using Python virtual environments to cleanly separate Qiskit from other applications and improve your experience.
The simplest way to use environments is by using the conda command,
included with Anaconda. A Conda environment allows you to specify a specific
version of Python and set of libraries. Open a terminal window in the directory
where you want to work.
Create a minimal environment with only Python installed in it.
conda create -n name_of_my_env python=3
source activate name_of_my_env
Or, if you’re using Windows
Install Anaconda
Search for Anaconda Prompt
Open Anaconda Prompt
Use the following commands
conda create -n name_of_my_env python=3
activate name_of_my_env
Next, install the Qiskit package, which includes Terra, Aer, Ignis, and Aqua.
pip install qiskit
Note
Starting with Qiskit 0.13.0 pip 19 or newer is needed to install qiskit-aer
from precompiled binary on Linux. If you do not have pip 19 installed you can
run pip install -U pip to upgrade it. Without pip 19 or newer this
command will attempt to install qiskit-aer from sdist (source distribution)
which will try to compile aer locally under the covers.
If the packages installed correctly, you can run conda list to see the active
packages in your virtual environment.
If you intend to use visualization functionality or jupyter notebooks it is recommended to install qiskit with the visualization extra requirements
pip install qiskit[visualization]
It is worth point at if you’re a zsh user (which is the default shell on newer
versions of macOS) you’ll need to put qiskit[visualization] in quotes:
pip install 'qiskit[visualization]'
Note
After you’ve installed and verified the Qiskit packages you want to use, import them into your environment with Python to begin working.
import qiskit
Note
If you want to contribute to the Qiskit community by developing and contributing code with the most recently updated Qiskit code, see Build Qiskit packages from source.
Access IBM Quantum Systems
IBM Quantum offers several real quantum computers and high-performance classical computing simulators through its IBM Quantum Experience with Qiskit. Follow these steps to set up your Qiskit environment to send jobs to IBM Quantum systems.
Note
With the release of Qiskit 0.11, if you had previously saved your IBM Quantum credentials locally, you might need to update your IBM Quantum Experience credentials so that you can use the new IBM Quantum Experience V2. See Updating your IBM Quantum Experience Credentials.
To configure your account, you create a local configuration file which includes an API key
1. Create a free IBM Quantum Experience account.
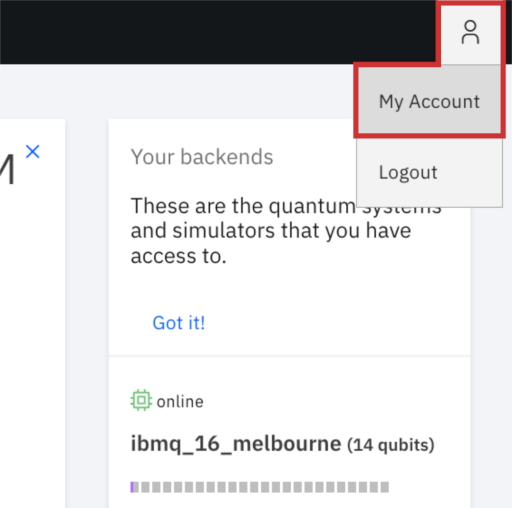
2. Navigate to My Account to view your account settings.
3. Click on Copy token to copy the token to your clipboard. Temporarily paste this API token into your favorite text editor so you can use it later to create an account configuration file.
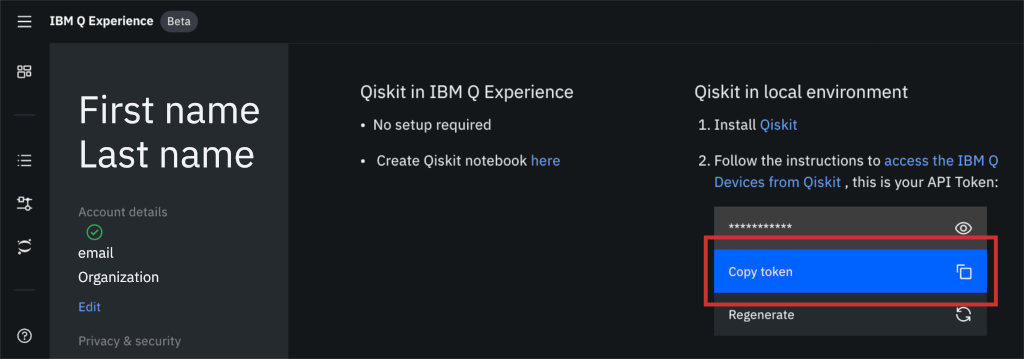
4. Run the following commands to store your API token locally for later use in a
configuration file called qiskitrc. Replace MY_API_TOKEN with the API token value that you
stored in your text editor.
from qiskit import IBMQ
IBMQ.save_account('MY_API_TOKEN')
For more details, such as how to manage multiple IBM Quantum account credentials, refer to this tutorial titled The IBM Quantum Account.
Checking Which Version is Installed
Since the Qiskit package includes a constellation of different elements,
simply printing the version by running qiskit.__version__ can be misleading as it
returns only the version for the qiskit-terra package. This is because
the qiskit namespace in Python doesn’t come from the Qiskit package, but
instead is part of the qiskit-terra package.
import qiskit
qiskit.__version__
'0.14.2'
To see the versions of all the Qiskit elements in your environment you can use
the __qiskit_version__ attribute.
For example, running the following command will return a dictionary
that includes the versions for each of the installed Qiskit packages.
qiskit.__qiskit_version__
{'qiskit-terra': '0.14.2',
 'qiskit-aer': '0.5.2',
 'qiskit-ignis': '0.3.3',
 'qiskit-ibmq-provider': '0.7.2',
 'qiskit-aqua': '0.7.3',
 'qiskit': '0.19.6'}
Tip
If you’re filing an issue or need to share your installed Qiskit versions for
something, use the __qiskit_version__ attribute.